Welcome to The OCD Plug

Check back regularly for discounts and new products!

  • Free shipping

    On all orders over $100

  • Money Back Guarantee

    Regular sales and discounts

  • Easy returns

    Hassle free returns policy

YOU HAVE NOTHING TO LOSE WITH OUT MONEY BACK GUARANTEE!

2021-2023 Lincoln Nautilus | 6 Piece (B and C Pillars) | Gloss Black PPF | Pillar Protector Kit

$7999 USD
Shipping calculated at checkout.

Description

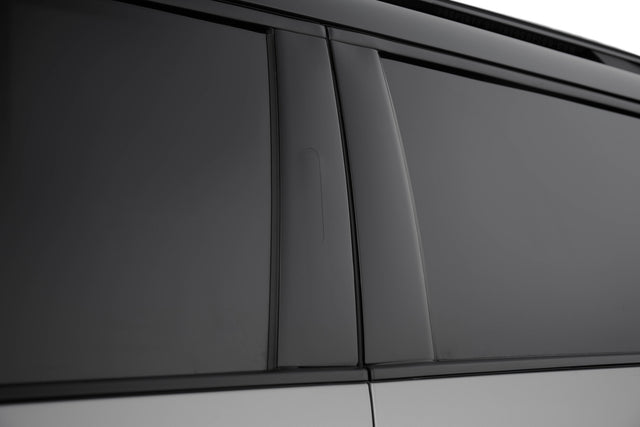
Introducing the 2021-2023 Nautilus PPF Pillar Protector Kits! Protect your vehicle's pillars with our precision cut Gloss Black PPF, designed from a 3D scan. Easily hide existing scratches and prevent future ones with the added bonus of optional Graphic Vinyl Overlays for a stylish touch. Upgrade your car's protection today!


INCLUDES 4 PIECES FOR A COMPLETE KIT

High Quality Piano Black PPF (High Gloss)

Includes: Installation instructions, Spray Bottle, Applicator Squeegee

Film Properties

To the edge design for a seamless appearance!

Every pillar protector is cut to the exact dimensions . The image is our actual product on an actual vehicle, not a false representation of what you will be getting. What you see is what you get.

Easy alignment!

There is nothing worse than a poorly aligned overlay. The kit includes everything you need for a wet install allowing you to slide the pillar protector around until it is perfectly centered! Once you get it straight, work the solution out from one edge to lock it in place! Full install details are in the instructions.

High Gloss Black PPF

Forget about swirl marks being an eyesore on your freshly washed and waxed vehicle. Our Pillar Protectors will mask existing swirls while resisting against new ones. This is achieved by using an opaque black PPF Film.

Self Healing

Equipped with self healing properties means durability. All it takes is a hot day and a little time for the film to heal its self from everything short of a tear.

Pillar Protector Installation Instructions

Application Solution: 6 Drops of Dish Soap: 1 Oz of water.

If you have well water, we highly recommend using bottled water since well water typically has a high mineral content.

Mix the solution in a separate container and pour it in to the supplied bottle. You may need to refill the bottle if you have several items to install so keep the solution handy.

  1. Thoroughly wash your hands.
  2. Fill a cup with water and a add Dish soap or Baby Soap per the formula. Soap is not optional and keep the cup of solution handy as you may need to refill the bottle.
  3. Fill the included bottle with the soap/water mix. Note: We supplied a small bottle due to shipping restrictions. It will be more convenient to use a larger one if possible.
  4. Unroll and locate the pillar protector you need to ensure you are placing the correct one where it belongs. Legends can be found on the listing. (Where you add to cart)
  5. Roll film in opposite direction of how it was packaged to flatten it out if necessary, this will make it easier to work with. The backing holds the shape of the roll, not the film. Waves and light creases are completely normal and will not be visible when applied. Slight imperfections in the finish of the material is common and will not be noticeable.
  6. Thoroughly clean the pillar to remove any dust, dirt.
  7. Dry the pillar to make sure it is clean and smooth.
  8. This step is just to help hold things so you can work.
  9. Place the applicator in your back pocket or within reach. You will need this handy later.
  10. Spray a little solution on the window closest to the pillar that you will be working on. DO NOT REMOVE THE PROTECTOR FROM THE BACKING YET. Place the protector on the window with the backing on the glass and the black film facing you. The water should hold the backing and film. If it looks like it is not going to hold, use more water or tape the backing to the glass. Now you are ready for the actual install and set up for success!
  11. Spray the pillar generously, You will want it wet! Now the pillar is wet and your protector is next to it just hanging out, hopefully STILL ON THE BACKING… :)
  12. Spray the face of the film and your hands. Keep your hands wet to protect the film from oils.
  13. Starting from the top, Peel the film from the backing and spray the sticky side as you go. Be generous with the soapy water mix, it will help you center the film to the pillar. It should be dripping wet.
  14. Spray the pillar with water again to make sure it is wet, then place the film on the pillar with no pressure. You should be able to slide the film around to make small adjustment.
  15. Align the film on the pillar starting with the top and looking along the edges. Make sure any gaps are equal all the way around. Check the bottom to make sure you are not too high or low and adjust as needed.
  16. If the film is not sliding easily, carefully remove it and spray with more solution. I hope you added soap and did not just use water.
  17. Once you are happy with the alignment, spray the film with more solution. Holding the film in place at the top. Using light/medium pressure, take your applicator (Felt side to the film) and in one motion start form the top, below your fingers, and drag down to the bottom. The goal is to press the water mix out from between the pillar and the film allowing the adhesive to work. Be careful not to snag the applicator on any cutouts for a keypad. One smooth continuous swipe down is all that is needed to lock it in place.
  18. The film is now locked in place along the center. Examine the cut out (if applicable)and work towards the center to make sure it has seated around it.
  19. Now starting from the same spot, below your fingers, swipe again but this time going up to seat the top.
  20. To seat the edges, work from the center of the pillar to the left/right edges. Imagine that you are trying to wrap the film around the edge of the pillar.This will ensure that the film lays down and wraps around the edges where applicable. Not all pillars are designed to wrap around. This is intentional to ensure a long lasting bond. Do this around the perimeter of the pillar.
  21. Finally, being careful not to snag an edge, dry the film/pillar to admire your work. If cleaned and installed correctly, there should be no bubbles and your pillars should look flawless!DO NOT wash or wet the vehicle for the next 48 hours. The moisture behind the film needs time to evaporate or they will move and possibly lift off of the panel. Once they have set, they will NOT come off with typical washing or driving through car washes.

Delivery and Shipping

Order Fulfillment Process

Upon receiving an order, our team initiates the fulfillment process by generating a shipping label. It's important to note that the printing of the shipping label does not necessarily mean that the item has been shipped; it signals the beginning of the fulfillment journey.

USPS Drop-off

Within 24 hours of generating the shipping label, we ensure that the packages are dropped off at the nearest USPS facility. While we make every effort to expedite this process, please be aware that the initial tracking information may not be immediately reflected on the USPS website.

Tracking Delays

USPS may not immediately update their tracking system to reflect the receipt of the packages. In some instances, it may take up to 5 days for movement to be visible. This delay does not imply that your package is stationary; rather, it might skip the intake scan for various reasons.

Shipping Beyond Our Control

Once the package is in the hands of USPS, the shipping process is beyond our control. We kindly ask for your patience and understanding during this period. USPS may experience occasional delays or anomalies in their tracking system, but rest assured that your order is in transit.

Customer Support

If you have any concerns or questions about your shipment, feel free to reach out to our customer support team. We are here to assist you and provide updates to the best of our ability.

Thank you for choosing us. We appreciate your understanding and cooperation.

Generic Installation Video:

Introducing the 2021-2023 Nautilus PPF Pillar Protector Kits! Protect your vehicle's pillars with our precision cut Gloss Black PPF, designed from a 3D scan. Easily hide existing scratches and prevent future ones with the added bonus of optional Graphic Vinyl Overlays for a stylish touch. Upgrade your car's protection today!


INCLUDES 4 PIECES FOR A COMPLETE KIT
Customer Reviews

Be the first to write a review
0%
(0)
0%
(0)
0%
(0)
0%
(0)
0%
(0)
The OCD Plug

2021-2023 Lincoln Nautilus | 6 Piece (B and C Pillars) | Gloss Black PPF | Pillar Protector Kit

$7999 USD

Introducing the 2021-2023 Nautilus PPF Pillar Protector Kits! Protect your vehicle's pillars with our precision cut Gloss Black PPF, designed from a 3D scan. Easily hide existing scratches and prevent future ones with the added bonus of optional Graphic Vinyl Overlays for a stylish touch. Upgrade your car's protection today!


INCLUDES 4 PIECES FOR A COMPLETE KIT

View product